A web browser is an integral part of almost any kiosk application. There are several web browsers available on the .NET platform that vary in performance and supported features. To find out which implementation is best suited for my needs, I have tested all major products with several popular web browser benchmarks.Benchmarks
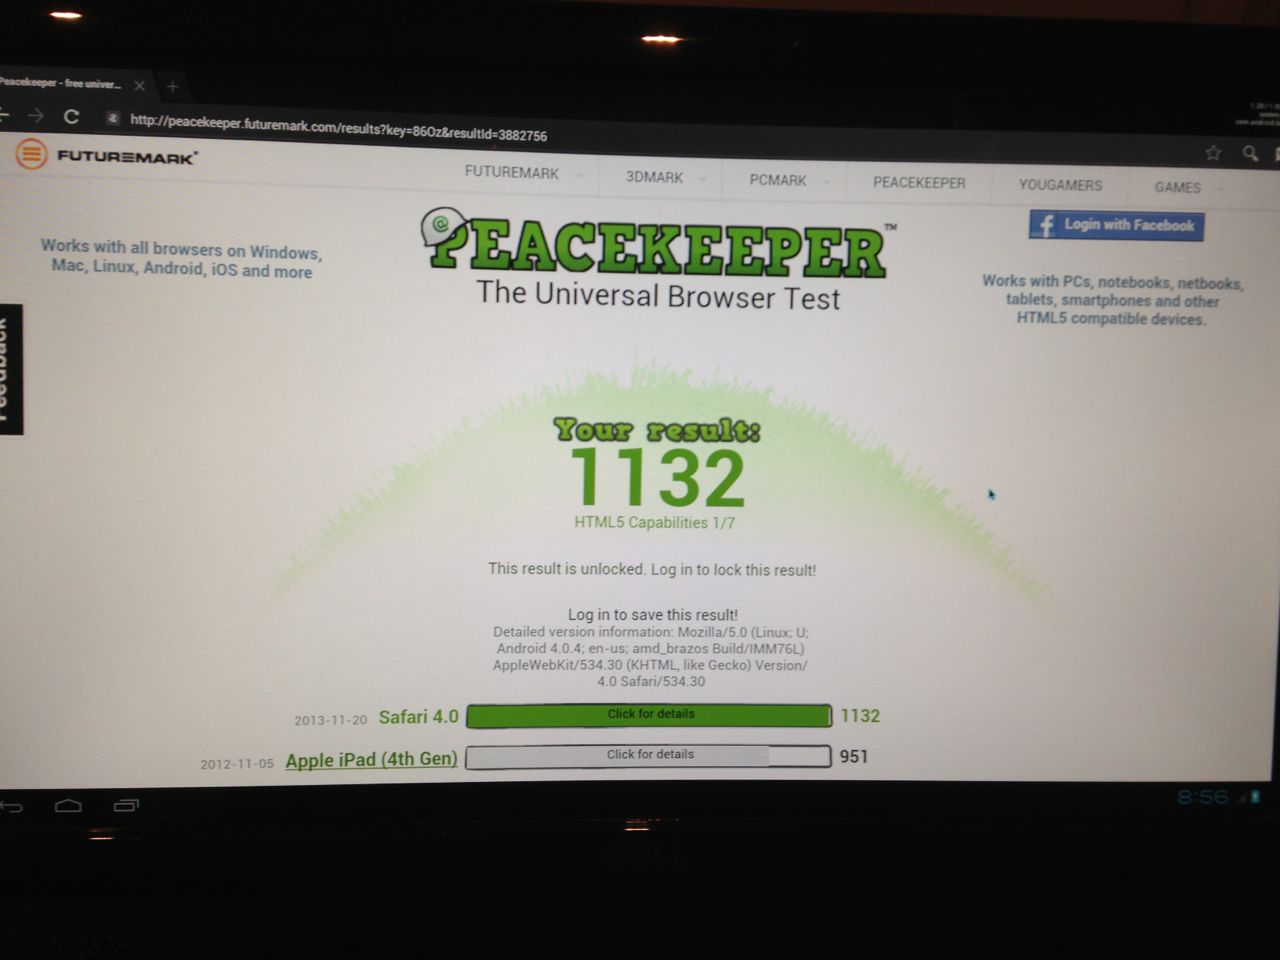
Peacekeeper
Peacekeeper is a popular online benchmark that is focused on measuring JavaScript performance. Its tests were built by profiling the code of four popular websites - YouTube, Facebook, GMail and Meebo, and analyzing the most most frequently used JavaScript functions. All tests fall into one of the following 8 categories: rendering, WebGL, HTML5 video, JavaScript web workers, 2D gaming, HTML5 canvas, data manipulation, HTML DOM operations and text parsing.
Aside from the overall score, the Peacekeeper also shows a number of tested HTML5 features that are supported by your browser.
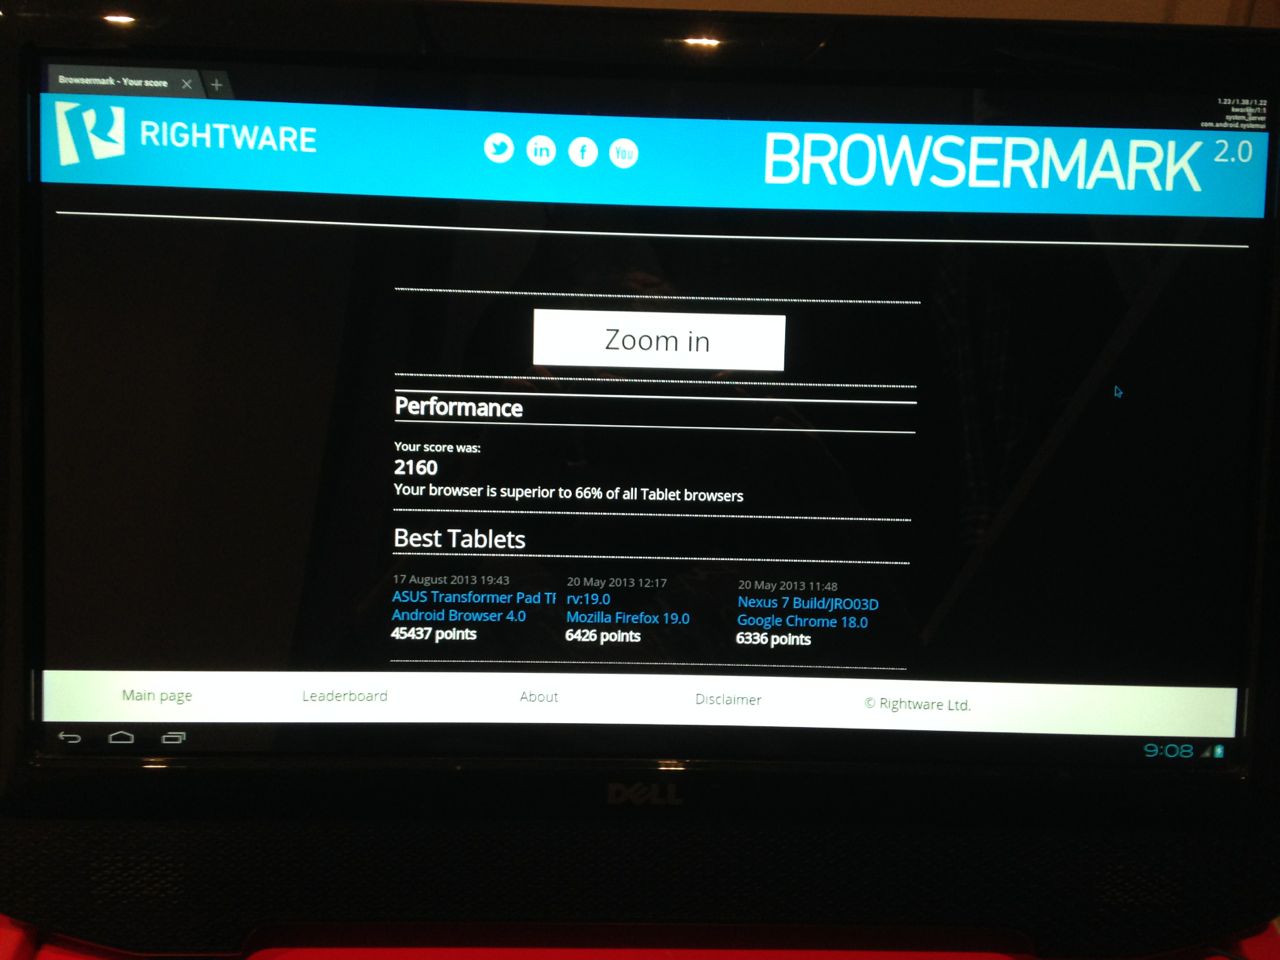
Browsermark 2.0
Browsermark is a web browser benchmark that has a wide range of tests. It does not only measures the JavaScript performance, but it also checks if your browser supports modern HTML and CSS features, as well as popular browser plug-ins such as Flash Player and Silverlight. There are 5 tests categories in total: CSS, DOM manipulations, 2D and 3D graphics, JavaScript performance and general HTML tests.
Fish Bowl
- HTML5 Fish Bowl is one of the Internet Explorer Test Drive tests by Microsoft. It is a simple tests that measures 2D performance of your browser. The result is a number of frames per second that your browser can output for a selected number of animated fish sprites on the screen. Since there is no final score for this test, I measured an average FPS count after a few seconds the test had started.
Software
I’m going to cover only full .NET framework browsers, namely Windows Forms and WPF browsers. Mono implementations, as well as WinRT, are outside of the scope of this article.
.NET 4.5 has two built-in web browser components: System.Windows.Forms.WebBrowser for Windows Forms and System.Windows.Controls.WebBrowser for WPF applications. Both are based on the Internet Explorer that is installed on the user’s machine, so the performance may vary. I’m going to use Internet Explorer 9. It also worth mentioning that by default a WebBrowser component works in a IE7 emulation mode, unless you make some changes to the system registry, so many modern HTML features may not be available.
There are also several 3rd party implementations available on the market. Most of them can be used both in Windows Forms and WPF hosts, so I’m going to tests both versions when available. I have selected the following projects for my research:
All of them, except for the last one, are based the Chromium web browser. GeckoFx is using Firefox.
The target system is running Windows 7 Professional x86-64 with Service Pack 1 installed. The .NET framework version is 4.5.1. All browsers are tested in fullscreen mode with resolution of 1920x1080 pixels. The complete source code for each browser test is available on github.
Hardware
Most of the tests are directly dependent on CPU performance, but you can rarely find a powerful CPU in kiosks and other similar installations. I’m going to use the same hardware as I previously used in my Android x86 test run:
- ASUS E45M1-M PRO
- AMD E-450 @ 1650 MHz
- ATI Radeon HD 6320
- 2x4 GB DDR3 1600 MHz (PC-12800) RAM
- Kingston V100 32 GB SATA II SSD
The system score for hardware is:
- Processor: 3.9
- Memory: 5.9
- Graphics: 4.4
- Gaming graphics: 5.8
- Disk: 5.9
Results
Peacekeeper
As you can see, the default .NET implementation is not the best choice when you need a proper web browser in your app. GeckoFx has the best HTML5 features support, but it lacks speed, probably because it uses XULRunner technology.
Browsermark 2.0
As in the previous benchmark, the built-in WebBrowser component failed all HTML5 tests, which made it impossible for the Browsermark to run.
Surprisingly, Windows Forms hosts showed a little more higher scores in this benchmark than their WPF counterparts. It’s probably due to the fact that WPF renders everything into a buffer before showing on screen. Browsermark is more graphics-oriented benchmark than Peacekeeper, which is why there is almost no difference between Forms and WPF scores in the first batch of results.
Fish Bowl
Once again the WebBrowser component failed to initialize the test page. It’s no surprise, the Fish Bowl test was first introduced as a demo for Internet Explorer 9, which was a huge step forward in terms of web standards support.
You can see an even bigger gap between Windows Forms and WPF results in this test. WPF is definetly a bottleneck when it comes to a raw graphics performance.
]]>